Practical Workflows with Hug SCM
You've learned the basics of version control with the Beginner's Guide and understand concepts like commits and branches. Now, it's time to level up. This guide shows you how to combine Hug's commands into fluid, powerful workflows that you'll use every day in a professional development environment.
We'll structure this guide around the typical lifecycle of building a feature, from a fresh branch to a clean merge.
Mnemonic Legend
- Bold letters in command names highlight the initials that make each alias (for example,
hug sl→ Status + List). - For deep dives on specific commands, refer to the command reference pages (e.g.,
[Working Directory (w*)](commands/working-dir.md)).
The Core Development Cycle
This workflow is the backbone of most feature development.
1. Starting a New Task
Scenario: You're about to start work on a new feature, "user-authentication". First, you need a clean, up-to-date branch.
Workflow:
- Switch to the main branch:
hug b main(Branch) - Get the latest updates:
hug bpullr(Branch Pull with Rebase) - Create your feature branch:
hug bc feature/user-authentication(Branch Create`)

Why it works: This sequence ensures you start from the most recent version of the main branch, which helps prevent merge conflicts later. Using bpullr maintains a clean, linear project history.
2. The "Inner Loop": Code, Commit, Repeat
This is where you'll spend most of your time: writing code and saving progress. The goal is to make small, logical "atomic" commits.
Scenario: You've implemented the login form and want to commit it.
Workflow:
- Check your status:
hug sla(Status List All) to see tracked and untracked files. - Review your changes:
hug sw(Status Working diff) shows a combined diff of everything. - Stage your changes:
- For everything:
hug aa(Add All) - For just one part of a file:
hug ap(Add Patch) for an interactive staging session.
- For everything:
- Commit:
hug c "feat: Add user login form"
Handling Interruptions: The WIP Workflow
Scenario: You're in the middle of a complex change when an urgent bug report comes in. You can't commit your broken code, but you can't lose it either. This is what the WIP (Work-In-Progress) workflow is for.
Workflow:
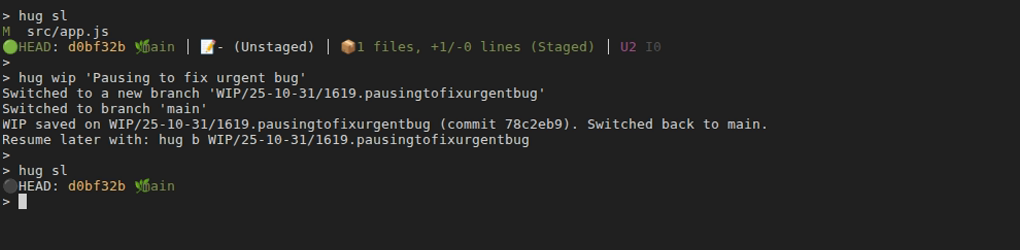
- Park your current work:
hug wip "Refactoring user model"(Work In Progress)- This command takes all your changes (staged, unstaged, and untracked), commits them to a new, dated WIP branch, and cleans your working directory. You remain on your original feature branch.
- Switch to a hotfix branch:
hug b main && hug bc hotfix/urgent-bug - Fix the bug, merge it, and return:
# ... do the work ... - Resume your work:
hug b feature/user-authenticationand thenhug w unwip(Unpark WIP). Select the WIP branch you created.- This squash-merges the work from the WIP branch back into your feature branch, restoring your changes so you can continue where you left off.
The WIP workflow is a safer, more robust alternative to git stash. See the WIP Workflow Guide for more details.
Fixing Your Last Commit
Scenario: You just committed, but you forgot to include a file, or you made a typo in the commit message.
Workflow:
- Stage the missing file:
hug a forgotten-file.js(Add) - Modify the most recent commit:
hug cm(Commit Modify)- This opens your editor with the last commit message, allowing you to edit it. When you save and close, the staged changes will be added to that commit instead of creating a new one. This keeps your history clean.

3. Preparing for Review
Scenario: Your feature is complete! Before you create a pull request, you want to clean up your commit history. You might have several "WIP" or "fixup" commits that should be combined into one or two logical commits.
Workflow:
- Sync with the main branch:
hug bpullrto pull the latest changes frommainand replay your local commits on top. This is the best time to resolve any conflicts. - Start an interactive history edit:
hug rbi main(Rebase Interactive)- This opens an editor with a list of all the commits you've made on your feature branch.
- You can reorder them,
rewordtheir messages,squashthem into the commit above them, orfixup(squash without keeping the message).
- Push your clean branch:
hug bpushf(Branch Push Force)- Because you've rewritten history, a normal push will be rejected. A safe force push (
hug bpushf) is required. Only do this on your own feature branch that no one else is using.
- Because you've rewritten history, a normal push will be rejected. A safe force push (
3a. Cherry-Picking a Critical Fix with hug ccp
Scenario: While working on your feature branch, you discover a critical bug in the main branch. You fix it locally, but need to apply the fix to main immediately without merging your entire feature.
Workflow:
- Identify the fix commit: After committing your bug fix on the feature branch, note the commit hash (e.g., from
hug l -1) - Switch to main:
hug b main(Branch) - Pull the latest:
hug bpull(Branch Pull) - Copy the fix:
hug ccp a1b2c3d(Commit CoPy) wherea1b2c3dis your fix commit - Push the fix:
hug bpush(Branch Push) - Return to your feature:
hug b feature/user-authentication
Why it works: Cherry-picking (ccp) lets you selectively copy individual commits between branches. The original commit hash is preserved in the commit message (via -x flag), maintaining full traceability. This is perfect for hotfixes, backports, or applying specific changes without merging everything.
Pro tip: If you need to cherry-pick multiple commits, you can specify them all at once: hug ccp a1b2c3d e4f5g6h i7j8k9l
3b. Rescuing Commits on the Wrong Branch with hug cmv
Scenario: You've been coding for an hour and made 3 great commits... but you just realized you're on main instead of your feature branch! Or worse, you meant to create a new branch but forgot.
Traditional Git approach (complex and error-prone):
git checkout -b feature/oops        # Create the right branch
git checkout main                   # Go back to main
git reset --hard HEAD~3             # Remove commits from main (scary!)
The Hug way (simple and safe):
hug cmv 3 feature/new-feature # Move last 3 commits to new branchWhat just happened:
- Hug created a new branch
feature/new-featureat your current position - Moved HEAD on
mainback 3 commits (keeping your working directory clean) - Automatically switched you to
feature/new-featureso you can continue working - All in one command!
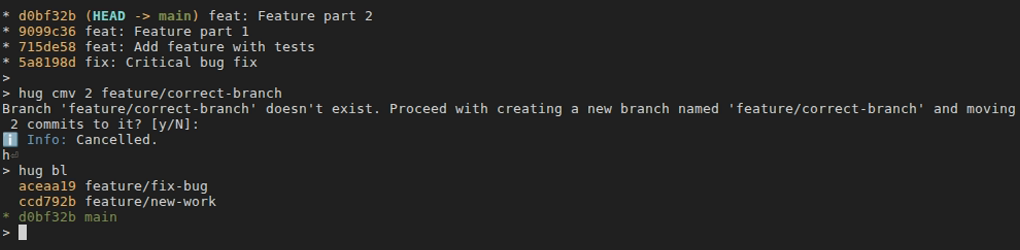
Even better - moving to an existing branch:
hug cmv 2 feature/existing # Move last 2 commits to existing branchHug will cherry-pick your commits onto the existing branch, then reset the current branch back. You end up on feature/existing, ready to continue.
The ultimate rescue - using upstream mode:
hug cmv -u feature/local-work # Move all local-only commits to new branchThis moves ALL commits that aren't yet on the remote, perfect for when you've been working offline or forgot to create a branch from the start.
Why cmv is powerful:
- One command instead of many: No need for multiple git commands with arcane flags
- Safe by default: Shows you what will happen and asks for confirmation (use
--forceto skip) - Automatic branch switching: Lands you on the target branch ready to continue
- Works with ranges:
hug cmv a1b2c3 feature/fixmoves all commits aftera1b2c3
4. Merging and Cleaning Up
Scenario: Your pull request has been approved and merged!
Workflow:
- Switch to main and update:
hug b main && hug bpull - Delete your local feature branch:
hug bdel feature/user-authentication(Branch DELete) - Delete the remote feature branch:
hug bdelr feature/user-authentication(Branch DELete Remote)
Specialized Workflows
Investigating History
Scenario: A bug was introduced recently, and you need to find out when and why.
Workflow:
- Find the last change to a file:
hug llf <file> -1(Log Lookup File) shows the most recent commit that touched a file, even if it was renamed. - Search commit messages:
hug lf "keyword"(Log Filter) searches all commit messages for a term. - Search code changes (the "pickaxe" search):
hug lc "functionName"(Log Code search) finds commits wherefunctionNamewas added or removed. - See who changed what:
hug fblame <file>(File Blame) shows the author of every line in a file.
Undoing Mistakes Safely
There are two main ways to undo work, depending on whether the mistake is public (pushed) or private (local).
Local Mistake: "I just made a bad commit on my machine."
- Solution:
hug h back(HEAD Back). This moves the branch pointer back one commit but keeps your changes staged. You can edit them and re-commit correctly. It's the safest way to undo a local commit. - Use
hug h undo(HEAD Undo) to do the same, but leave the changes in your working directory (unstaged). 
- Solution:
Public Mistake: "I pushed a commit that broke the build."
- Solution:
hug revert <commit-hash>(Revert a commit). This creates a new commit that is the exact opposite of the bad commit. - This is the safe way to undo public changes because it doesn't rewrite history. Anyone who has already pulled the bad commit can simply pull the new revert commit to fix their local repository. After reverting, just
hug bpush(Branch Push).
- Solution:
Advanced Commit Management Workflows
These workflows showcase the power of hug ccp (cherry-pick) and hug cmv (commit move) for elegant branch and commit management.
Workflow 1: Backporting a Feature to a Release Branch
Scenario: You've merged a critical feature into main, but it also needs to go into the v2.1-release branch that's already deployed to production.
Using hug ccp for selective backporting:
# 1. Find the commits you need to backport
hug l main -5  # Shows last 5 commits on main
# Let's say commits a1b2c3d, e4f5g6h, and i7j8k9l are the feature

# 2. Switch to the release branch
hug b v2.1-release

# 3. Pull latest from release
hug bpull

# 4. Cherry-pick the feature commits in order
hug ccp a1b2c3d e4f5g6h i7j8k9l

# 5. Test and push
# ... run tests ...
hug bpush
Why this works: Cherry-picking preserves the original commit metadata while applying changes to a different base. Perfect for maintaining multiple release branches.

Workflow 2: Reorganizing Work Across Branches
Scenario: You've been working on feature/big-refactor and made 10 commits. The last 3 commits are actually a separate, smaller feature that should be on its own branch for easier review.
Using hug cmv to split work:
# Currently on feature/big-refactor with 10 commits
hug l -10  # Review your commits

# Create a new branch with the last 3 commits
hug cmv 3 feature/small-enhancement

# Now you're on feature/small-enhancement with 3 commits
# feature/big-refactor only has the first 7 commits

# You can immediately push this for review
hug bpush

# Later, switch back to continue the big refactor
hug b feature/big-refactor
The magic: In one command, you've split your work into two logical branches without any complex rebasing or manual commit tracking.
Workflow 3: Collecting Fixes from Multiple Branches
Scenario: You have three feature branches, and each has a commit that fixes the same underlying bug. You want to collect all these fixes into a single hotfix branch.
Combining ccp with branch navigation:
# 1. Create a hotfix branch from main
hug b main
hug bc hotfix/critical-bug

# 2. Cherry-pick the fix from each feature branch
hug ccp feature/auth-redesign~2    # The fix commit is 2 steps back
hug ccp feature/api-update~1       # The fix is 1 step back here
hug ccp feature/ui-polish          # The fix is at the tip here

# 3. Now squash them into one clean fix
hug h squash 3

# 4. Push the consolidated fix
hug bpush
Workflow 4: The "Oops, Wrong Branch" Recovery
Scenario: You spent the morning making 5 commits, then realized you're still on main instead of a feature branch. This is a common mistake, but hug cmv makes recovery trivial.
Before Hug cmv (the painful way):
git log --oneline -5                    # Note commit hashes
git checkout -b feature/my-work         # Create new branch
git checkout main                       # Go back to main
git reset --hard origin/main            # Scary! Removes commits
git checkout feature/my-work            # Back to feature branch
git cherry-pick <hash1> <hash2> ...     # Manually reapply each commit
With Hug cmv (the elegant way):
hug cmv 5 feature/my-workThat's it! One command:
- Creates
feature/my-workat current position - Resets
mainback 5 commits - Switches you to
feature/my-work - Ready to continue working
Workflow 5: Moving Local-Only Commits to a Feature Branch
Scenario: You've been experimenting directly on main offline (no network). You made 8 commits before realizing you should've been on a feature branch. The last time you synced, main had commit x9y8z7w from origin.
Using upstream mode with cmv:
# Check what you've done locally
hug llu   # Shows commits not on remote (shorter command, and shows more than 'git log @{u}..HEAD' would)
# Let's say there are 8 local commits

# Move ALL local-only commits to a new branch in one shot
hug cmv -u feature/offline-work

# Hug automatically:
# - Detects you have 8 commits after origin/main
# - Creates feature/offline-work with all 8 commits
# - Resets main back to origin/main
# - Switches you to feature/offline-work
Pro tip: The -u flag is quite useful - it automatically figures out how many commits to move by comparing with the upstream branch.
Workflow 6: Interactive Commit Selection with ccp
Scenario: A colleague's feature branch has 15 commits, but you only need commits #3, #7, and #12 for your work.
# 1. Review their branch
hug b colleague/feature
hug ll -15  # See all commits

# 2. Go back to your branch
hug b my-feature

# 3. Cherry-pick just what you need
hug ccp colleague/feature~12  # Commit #3 (12 steps from tip)
hug ccp colleague/feature~8   # Commit #7 (8 steps from tip)
hug ccp colleague/feature~3   # Commit #12 (3 steps from tip)
Alternative: Use commit hashes directly:
hug ccp a1b2c3d e4f5g6h i7j8k9lQuick Reference: When to Use What
| Scenario | Command | Why |
|---|---|---|
| Copy a bug fix to another branch | hug ccp <commit> | Selective application without merging |
| Wrong branch for your commits | hug cmv N <branch> | One-command rescue and reorganization |
| Split feature into smaller branches | hug cmv N <new-branch> --new | Clean separation of concerns |
| Backport to release branch | hug ccp <commits> | Maintain multiple versions |
| Move local work to feature branch | hug cmv -u <branch> | Sync with remote automatically |
| Collect commits from multiple branches | Multiple hug ccp | Build consolidated changes |
Key Differences:
hug ccp(Commit Cherry-Pick): Copies commits to your current branch. Original commits stay where they are. Great for sharing specific changes across branches.hug cmv(commit move): Moves commits from current branch to target branch. Current branch gets reset. Great for fixing branch mistakes or reorganizing work.
Both commands are designed to be safer and more intuitive than their Git equivalents, with built-in previews and confirmations to prevent accidents.